Tuesday, January 5, 2016

Excavation for Foundation

Before any excavation work starts, you must plan the work carefully and give due consideration to the safety aspects, particularly any potential hazards such as services and cables beneath the ground.
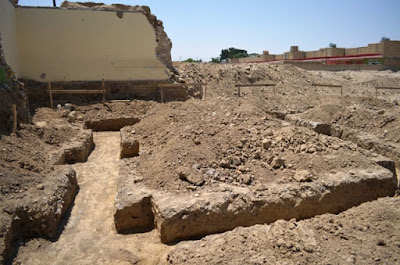
Excavation Depth 

Typically, deep strip foundation such as the ones shown here for a new extension will be a metre deep. The anticipated depth will be marked on the drawings for the work but site conditions as the work proceeds may require that they are deeper than originally specified. The district Surveyor will inspect the excavation and determine whether the base provides suitable load bearing capacity. Factor such as the proximity, height, and species of any trees will also be taken into account as well as the volume change potential of the soil. Trees can draw a lot of moisture from the surrounding ground and inadequate consideration of this may lead to subsidence of the new work.


Setting Out Trenches 


 The first job is to set out a base line for the work. This might be one of the main walls of the new work. All other setting out will be in relation to this so it is important to get it accurately set out. Fixed point such as the corner of an existing wall are used to establish this base line. Take measurement to the first point on the base line from two known points on your approved drawing and mark the first end of the base line.Repeat the process for the other end.With the base line in place,begin setting out the rest of the lines denoting each of the walls.Lines at right angles to one another can easily be established by using a builders square like the one shown in the picture. When setting out the lines, always double check your measurements,and check that the diagonals of square and rectangular elements are equal. This ensures that the angles are indeed right angles. if the ground is on a slope make sure that measurement are taken horizontally - not along the slope as this will be different. Remember, the could result in an order to take it down.

Once the lines have been established,it is common to make up profile boards.These are flat timber boards mounted on pegs driven into the ground and are set a metre or so away from each end of the new walls. This ensure that they won't get in the way or get knocked. On the face of these boards,the line of the foundation edges and brickwork edges are marked so that a string line may be run between them to identify the outline of various elements on the ground.

Mark out the trenches for the new foundations with spray line marking paint.These aerosol spray paints make line marking very quick and they will easily visible as work proceeds.

Excavating Foundation - Mini Digger


Determine a suitable order of working. Much will depend on the method you are using - hand digging or use of a small digger.When using a mini digger like the one shown, you will want to work backwards away from the building if possible so that the machine is sat on solid ground at all times.

If the machine has to be used over an existing part of the excavation, steel plates will need to be laid over the trench spanning sufficiently to be fully supported by the ground on either side. Steel plates like the ones seen covering exposed road works, strong enough to support the digger, can be hired.

As the excavating work gets underway, keep a careful watch for buried services such as drains and cables. If any are spotted stop work immediately and make the area safe before continuing. Failure to do so can result in damage like this

The bucket used on the mini digger in the pictures is 600mm wide - the appropriate width for the foundation to be excavated. Gradually excavate to the required depth, taking a modest layer of soil away with each pass. The excavated soil can be deposited from the bucket to a spoil heap or be taken straight to a skip. On this project, two men with barrows worked back and forth between the digger and the skip on the front drive. When digging by hand, the spoil can be loaded straight into barrow and removed from the area.

As the depth of the foundation progresses pay attention to the sides of the trench. These should be vertical and straight. Firm soil will hold up well but areas of loose soil can result in the sides of the trench collapsing. If there is a risk that the sides will fall away, suitable support will need to be positioned to allow work to continue. Alternatively, the trench may be dug with angled sides so that the soil is raked back and is self supporting. The big disadvantage with this is, of course, that much more material needs to be excavated and, consequently, back filled.

The depth of the excavation should be checked at regular intervals. This can be done with a steel tape or depth rod either from known levels, or from string lines between the marked finish levels on site pegs.

In the picture, you can just see the top of a clay pipe which has been exposed. This just goes to highlight the importance of excavating carefully and removing shallow layers at a time. This drain feeds to a soak away in the garden. The area around this will need to be dug by hand to prevent any damage to it. The drain run itself is towards the end of one of the foundations.However, beyond this point, there is to be a new garden wall so the foundations are continued for this at the same depth. This will allow the drain to be bridged by steel work set in the concrete foundations so that it is protected. The depth of the base of the footing will need to be below that of the clay pipe otherwise there is a risk that it will be damaged.

Excavating Foundation - By Hand 


Ones the bulk area has been dug out, remaining sections such as those around drain runs can be completed by hand. A fork as used to loosen compacted soil and a shovel to scoop it out. The base of the final trench should be level.

Existing Structures 


Additional care must be taken when excavating next to the wall of existing structures so that there is no risk of undermining these. The foundation in the pictures are coming away from the house wall at right angles so excavation next to the wall is limited. It's surprising what you uncover sometimes - in the picture you can see how there is very little in the way of footings under the main house. This was built some hundred or so years ago and yet has stood there without any problems.

Safety Around Excavation  


Where excavation are to be left open, it is important to take steps to guard against accidents. Temporary fencing should be placed around the area if it is to be left unattached. Alternatively, suitable trench covering can be positioned over the excavations.

THANK YOU........


Monday, December 28, 2015

DENSITY OF SOIL IN PLACE BY THE SAND-CONE METHOD
SCOPE
This method of test is intended for determine the in-place density of soils. The apparatus described herein is restricted to the tests in soils containing particles not large than 2 in diameter.

APPARATUS 
  1. Sand pouring Apparatus
  2. Standard sand-graded between the No.25 and No.52 B.S. Sieves 
  3. Soil tray with a central hole 
  4. Balance of 15kg capacity
  5. Sensitive balance of accurate to 0.1gm 
  6. Oven

Miscellaneous equipment such as small pick, chisels or spoon for digging test hole, moisture tins.

PROCEDURE

1. Density of sand 

     Fill the Sand Pouring Apparatus with known mass of sand (M1) and place it concentrically on top of the calibrating cylinder. Open the shutter and allow sand to drain out. When no further movement of sand takes place in the apparatus close the shutter and weight the sand remaining in the apparatus (M2) (M1-M2) represent the quantity of sand used in filling calibrating cylinder as well as cone of the apparatus.


    Now [(M1-M2) (W1-W2)] gives the mess of sand required to fill the calibrating cylinder .
Volume (Vc) of the cylinder may be determined either by measuring its internal dimensions or by filling it with water 
    Density of sand can be computed using mess of sand filled in cylinder and volume (Vc) of the cylinder.

2. Weight of sand Occupying the cone of the Sand Pouring Apparatus.

       Pour sand into the apparatus with valve closed and determine weight of apparatus and sand (W1) Place the apparatus on a smooth glass plate and open the valve to fill the conical portion.After the sand stops running,close the valve sharply, and weight the remaining sand into the apparatus (W2).
(W1�W2) represents the weight of sand required to fill the cone of the apparatus.Replace the sand removed in the apparatus.

3. Density of soil 

      Prepare the surface of the location to be tested so that it is a level plane. Keep the soil tray firmly on the place surface. Excavate with hand tools a hole with diameter equal to that of the hole of the plate and about 10cm in depth with smooth walls and rounded bottom edges. Place all loosened soil in a container being careful to avoid losing any material.Seat the already weighed apparatus with sand on the hole of the tray.Open the valve and after the sand has stopped flowing close the valve. Weigh the apparatus with remaining sand and determine the weight of sand occupying the cavity. weigh the material that was removed from the test hole. Mix the material thoroughly and weigh a representative sample for moisture determination. Dry and weigh the sample to determine moisture content.

CALCULATION
From the known density of sand and the weight of sand occupying the hole, calculate the volume of the hole.
From the weight of the soil cooped out of hole whose volume is now known and the value of moisture content calculate the wet and dry density of soil.

THANK YOU......


Wednesday, December 16, 2015

Introduction 

The construction site is usually prepared in two steps: first the vegetation is cleared, and then the surface soil layer is removed. These operations can be done either by hand or by machine.in both case, special pieces of equipment such as ropes, cables and chains may be required. You will learn about these first, to be able to make the best and safest use of them.
First remove the vegetation 

Then remove surface soil to the out side limits of the site

    Ropes, cables, chains block and fittings
    Using the equipment
    
Ropes, cable, chains, pulley block and fittings are normally used for pulling down and clearing        heavier trees, brush, etc., for pulling out rocks or other obstructions, and for moving heavy equipment around the site. The important factors are the pulling or traction load and the strength of the different components. The load can be applied either by hand using animal power, or by machine.


Clearing the site


  • The site should be cleared of all obstructions such as
woody vegetation,where the roots can cause severe cracking in pond structures such as concrete water inlets and outlets.

Tree stumps which, when decaying, can also weaken concrete pond structures by leaving voids in the soil.


Large stones,which may need to be dug out

Ant hills and animal burrows, which should be dug completely; clayey soil should be tramped into the hole created.


Where to clear
Define carefully the exact area to be cleared before you begin. Determine the outer corners of the building area, which should include the entire area to be covered by dikes. You could mark the area using wooden stakes and cord or poles. When this is done, mark out an additional area beyond the dikes to serve as a work space and a walkway around the site.Then you are ready to proceed.

Proceeding with the clearing
The clearing method to be used largely depends on the type of vegetation on the site. In open savannah country, it is a relatively easy task that can be done manually with limited special equipment. In heavier forested area on the country, clearing generally requires either a large work force and/or the use of machines. If an area is too heavily forested, it might be best not to select it as a construction site, unless no other alternative exists.

*There are two basic ways to clear the woody vegetation from a site:

  1. You can cut the trees and then remove the stumps.
  2. You can feel whole trees with their roots attached.
Fell whole trees with roots


Cut trees and then remove stumps

The clearing of the site should be completed by gathering all cut vegetation, stumps, roots and large stones.All these should be removed from the work area. When conditions are dry enough, the clearing can be completed by starting a fire, which should be carefully kept under control.

Gather cut vegetation and burn it 


Collect large stones and carry them away

Note. You  can often sell the wood cleared from the site or make charcoal and sell it at a good price

The cutting of trees
  1. Tree cutting is a very dangerous job. It requires much skill and experience to avoid accidents. If you have never cut trees before, you should subcontract this specialized work to people known for their practical experience.You should however learn about a few basic point that will help you to plan this clearing operation better.
  2. High stumps are more easily removed than low ones. This is particularly true if you remove the stumps using either a winch or low-powered machinery.Reminder that if the wood is valuable,you will get less money from shorter trees.
High stamps are easier to remove, but give less usable timber 

Low stumps are harder to remove, but give more usable timber 

Preliminary work

Remove shrubs and undergrowth 


Ready to cut

Basic steps for cutting trees 

There are two steps when cutting trees
  1. Making the undercut: cut a pie-shaped piece out of the tree on the side facing the direction in which the tree is supposed to fall. The depth of the cut should be one-fifth to one-quarter of the diameter of the tree.
  2. Making the back cut: 3 to 5cm above the base of the undercut and at right angles to the falling direction, cut horizontally nearly all the wood that remains on the back of the tree.


If at the end of the backcut, the tree does not fall by itself, hammer a wedge into the backcut to push the tree over in the desired direction.If pulling or guide cables are to be used, they should be attached before the cutting is started.

Note: felling large trees may be dangerous. For tree with a diameter over 60cm at the stump, special techniques have to be used.


Selecting equipment

Small trees can be chopped with an axe theycan be sawed. A handsaw requires two operators and the use of a wedge in the backcut.

Felling by hand

Chainsaws 


The removal of tree stumps
  1. Standard way of removing tree stump from the ground are either to dig them out or to pull them out.small stumps can easily be dug out by hand.Larger stumps may require the use of machine power. Stump pulling is done by placing a rope, cable or chain around the trunk and pulling as follows.
  • Direct pull by an animal or machine
  • Winding in of a cable on a winch
  • A combination of these methods with pulley blocks 
     2. In the next section ,you will learn about the most appropriate methods.

Dig small stumps by hand


Pull large stumps with animals, machine power or winch using pulley blocks as needed 


Digging out tree stumps by hand
 To make work easier, dig trenches around the stump in the following sequence, cutting any roots encountered.

                                                          1.Dig trench 1

     2. Dig trench 2


      3.Dig trench 3

Pull the top of the stump as shown. If it fails to be dislodged, dig trench 4 and cut remaining roots.Try again to dislodge the stump.

If you cannot pull it out


Dig trench 4

Then pull again

Note. if the trunk has been cut near the road,you should excavate around the stump.


Lift the stump out of the ground if it is a small stump, put a rope or chain around the foot of the stump. If it is a large stump,first attach a rope or chain around one of the strong stump roots.

Small high stump

Lead the line over a notched pole, a stumping trestle or shearlegs,which you can easily make yourself . while pulling the line with one group of people, have other people push the stump up with crow bars to free it from the ground.

large law stump 

Push with crowbar 

Removing tree stump with hand winch

A hand winch consists of a metal casing in which a double set of claws grips a steel cable. A hook is secured to the back of the casing.As the handle of the winch is cranked,the claws move horizontally and pull the cable inside the winch casing. Excess cable comes out through the back.The cable is equipped with a hook at its end. There are various models of hand winches available, their traction force varying from 0.5 to 10 tonnes. A very useful one is the more common three-tonne hand winch.

Hand winches 


To remove a tree stump with a hand winch proceed as follows:
  1. Use a robost standing tree or stump, a rock or a heavy vehicle not too far away from the stump to be removed. The distance between the two should not be longer than the length of the winch cable.
  2. Tie a sling (a steel cable with two thimbles) around the base of the standing tree or other object which will be used as an anchor.With a vehicle, attach the hook or cable directly to the towbar or chassis fixing point .
  3. Attach the hand winch to this sling, using the hook at the back of the casing 


    Wrap sling around tree
 

Other ways to attach a winch 

To a vehicle

To a staked log


To an anchored steel plate

Tie either a sling or a chain around the stump to be removed 
  • it is best to use a chain long enough to be wrapped around the stump and from at its end an angle smaller than 60
  • If the diameter of the stump is too large to do this, it is preferable to use a cable sling 
  • To avoid the sling or the chain slipping off the stump, cut a groove around it into which the sling or chain will fit.
Attach winch to sling

Note: If the stump is too far from a possible anchor, enlarge the sling around the anchor with a chain or a cable and connect the latter to the winch hook.


 *Using the winch cable as a choker around the stump will damage it and greatly reduce its strength .Never do it
  

  • Attach the hook of the winch cable to this sling or chain.
  • Dig around all or part of the stump so that the bigger roots can be cut. 
  • Slowly start cranking the winch with its handle, checking that all line and their fittings are in order.
*Using a winch can be dangerous.check that each piece of equipment used is strong enough to withstand the traction farce applied by the winch. Check regularly for wear and tear. Keep people away from lines under tension.

.


Using the monkey winch

Another simple, reliable and heavy-duty winch is the monkey winch. It can be very effectively used in the same way as the hand winch.

Increasing pulling force 

You can easily improve your pulling efficiency for stump removal in the following way 
  • Apply a lifting action to the stump by using a notched pole, shearlegs or a stumping trestle and attaching the line to one of the strong roots 
  • Apply tipping action to the stump by making a notch in its top surface and attaching the chain as shown.
  • Use pulley block to increase the strength of your winch. Remember that this also increases the loading of the equipment such as sling, shackles and pulley block, which should be strong enough to withstand the extra loading .


Using pulley block to increase the pull


Using the winch with one pulley block

To double the strength of the winch, you can use one pulley block, and one (or better two) anchor(s) as follows.

  1. Attach the winch to its anchor 
  2. Run the winch cable in the block over the pulley and run it back to the anchor.
  3. Attach the winch cable to this anchor 
  4. Using a cable or a chain attach the hook of the pulley block to the stump to be removed 
  5. Dig a trench around the stump and cut all major roots that can be reached close to the stump 
  6. Crank the winch carefully
Example 
If you are using a small one-tonne winch, you can now pull the stump out with a two -tonne traction force as follows.
  • traction on winch cable = 1 tonne
  • Traction on single anchor = 1+1=2
  • Traction on stump = 2 tonne
if a second anchor is available, you may use it to attach the end winch cable , this will reduce the traction force by half on each of the two anchors, as shown below.


Use one pulley block

Using the winch with two pulley block

To treble the strength of the winch,you can use two pulley blocks and two anchors,as follow.

  1. Attach the winch to anchor 1
  2. Run the winch cable in the first pulley block and run it back toward the second block .
  3. Run the winch cable in this second pulley block, run it back toward the first block and attach the cable to it
  4. Attach the second block to strong anchor 2.
  5. Attach the first block to the stump.
  6. Crack the winch carefully, checking anchor 2 especially.
Example 
If you are using a small one-tonne winch, you can now pull the stump out with a three-tonne traction force as follows.
  • Traction on winch cable = 1 tone 
  • traction on anchor 1 =  tonne 
  • traction on anchor 2 = 2 tonnes
  • Traction on stump = 3 tonnes
Using two pulley blocks

When clearing a site with many trees, you should progress systematically from the centre of the site to its margins, so that 
  • the trees can serve as an anchor for each other
  • all trees can be pulled out


For large sites, it is also useful to clear several access areas through which trees can be moved out of the site.


Removing stumps with a bulldozer 

Crawler tractor with dozer blade


If a tractor equipped with a front-mounted dozer-blade is available, it can considerably speed up the removal of stump. This is particularly important for a forested site. For best efficiency, proceed as follows.
       
 01. Raise the dozer blade and place it against the trunk part of the stump.


    02. As you push against the stump,raise the blade further to apply a lifting action to the stump, it will also increase the grip of the tractor on the ground.


03. Tilt the trunk forward until the roots in front of the tractor are slightly out of the ground.


        04.Back the tractor and lower the blade 

01. Insert the blade under the roots.


05. Push while lifting with the blade to break the stump out of the ground.


Uprooting whole trees

A common method of removing smaller trees and their roots from a construction site is to uproot whole trees. This can be relatively easy because of the greater leverage obtained when pushing or pulling a tree at a point high up its trunk.But to be safe. this method should be used only if.

  • There is a adequate space.
  • The tree is not rotten, cracked or split.
Using a hand winch to uproot a whole tree


The pulling angle with the horizontal should not exceed 30o , if space is restricted or a grater angle of pull is required, use a pulley block to change the pulling direction.

Uprooting a whole tree using a winch

If you only have a hand winch or a monkey winch to work with, you can proceed as follows.
  1. Position the winch at a distance at least twice the height of the tree and as close as possible to a robust tree that can be used as the anchor.
  2. Attach the back of the winch to a sling/chain tied around the base this anchor tree.
  3. Climb up the tree to be uprooted and attached the winch cable high up the tree trunk to a sling/chain tied around it.
  4. Dig a trench around the base of the tree to reduce the resistance of the stump against pulling.
  5. Place a log against the base of the tree facing the winch to assist in the extraction of a maximum amount of roots and aid in removal of the soil.
  6. Crank the winch carefully 
*You can also use two anchor trees for example to change the direction in which the uprooted trees will fall.
*Always attach the cable to the tree to be pulled as high as possible and the sling to the anchor tree as low as possible 

Using one anchor tree 


Using two anchor trees


Uprooting a whole tree with machinery 


Select suitable way to  Preparing  your construction site.......

Sample Text

Powered by Blogger.

Total Pageviews

Video

Popular Posts

Our Facebook Page